Make a DIY book tracker bookmark
To make a DIY book tracker bookmark, you need a sheet of card, a ruler, a pencil, an eraser, and a fine pen, plus one of three layouts: a shelf of spines, a numbered grid, or a list of titles. Choose the layout, cut a strip to fit your book, pencil the lines, test the pen on a scrap, and then ink.
Which layout should you choose?
Choose the layout by what you want to see when you open the book. A spine shelf is a column of blank rectangles, and each finished title goes in the next empty one, so the strip fills up the way a shelf does. A numbered grid is a block of small cells with a light number in each. You fill a cell when you finish a book, and the count shows at a glance. A title list is a set of lines for books you plan to read next, and you cross one out when you finish it, so the next title is always in view. Rule one layout per strip. Each mark then keeps one meaning, and the lines stay wide enough for a title in small handwriting.
Dates, page counts, and a line about the book are a journal's job, covered in what to log on a journal bookmark. Choosing and pruning the list is in keeping a TBR on a bookmark.
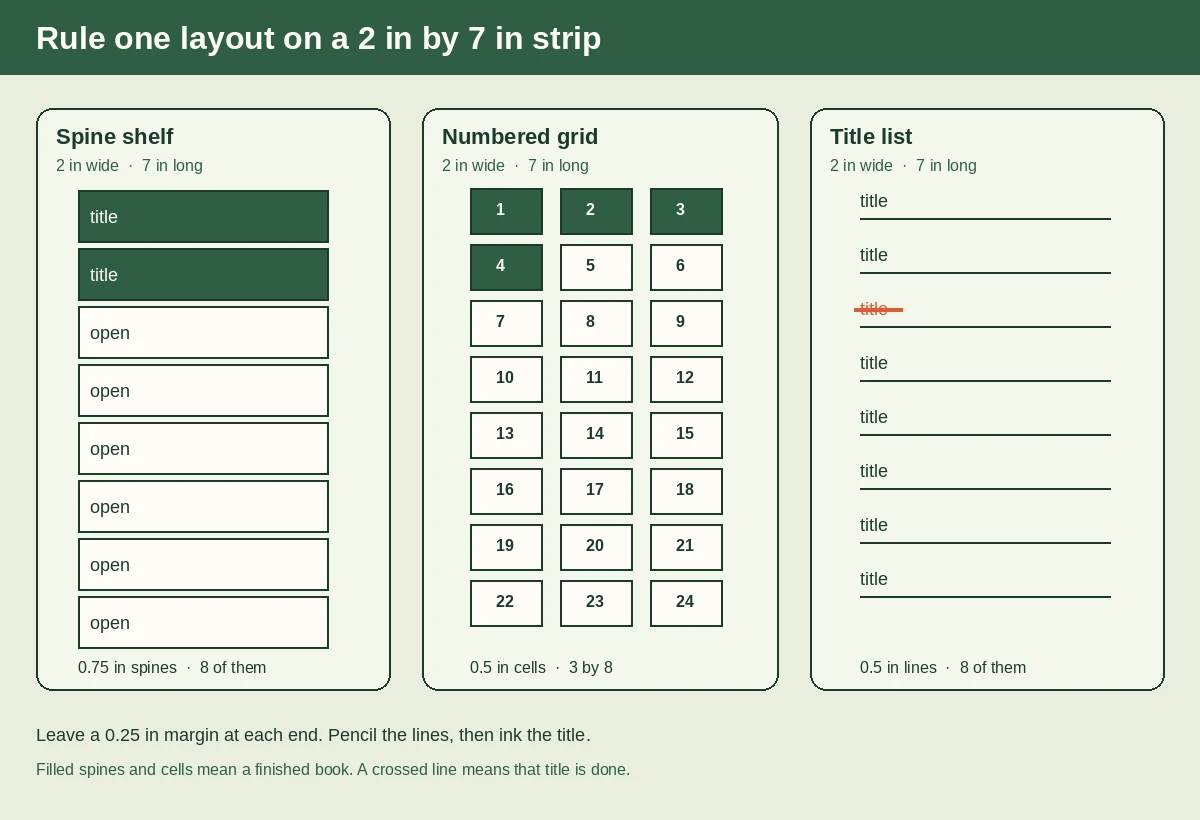
How big should you cut the strip?
For a tracker you will write on, cut a 2 by 7 inch strip; a 0.25 inch margin on every edge leaves a 1.5 by 6.5 inch field for the lines. Before you cut, lay the card against the closed book the strip will live in. The top of the strip should stay inside the pages, so no corner pokes out and bends. If the strip would stand too tall in a smaller book, mark it shorter and plan fewer lines, keeping the same spacing. Pencil the length and width on the card, then cut along a ruler with a craft knife or a paper trimmer. Scissors wander on card, and every line you rule later is measured from these edges, so they need to be straight and square.
A US Letter sheet is 8 1/2 by 11 inches. Four 2 inch strips take 8 of the 8 1/2 inches across, so one row of four fits with a sliver to trim. That row of 7 inch strips leaves a 4 inch band across the bottom of the 11 inch sheet, and that band is your scrap for the pen test.
With a metric ruler, cut a 50 by 175 mm strip instead; a 5 mm margin on every edge leaves a 40 by 165 mm field. An A4 sheet is 210 by 297 mm. Four 50 mm strips take 200 mm of the 210 mm width, and a row of 175 mm strips leaves a 122 mm band at the bottom for the pen test.
If the strip will stay in one book for months, use acid-free card, because acid in a loose bookmark can move into the pages. Other lengths, and how to choose one for a given book, are in the bookmark size guide.
How do you pencil the lines?
Pencil the layout lightly, and measure every line from the same straight edge so the spacing stays even from top to bottom. Take the spacing for your layout from the table below. Start at the top of the field and work down. Tick each measurement at both sides of the strip, then join the two ticks with the ruler, because a line drawn from a single tick tends to drift. Keep every line inside the field, away from the edges your fingers pinch. For the grid, pencil a small number in the corner of each cell as you go. When the layout is done, hold the strip at arm's length. If a line wanders or one gap looks wider than its neighbors, erase it and draw it again. Mistakes are cheap in pencil and permanent in ink, so fix them now.
| Layout | 2 x 7 in strip | 50 x 175 mm strip |
|---|---|---|
| Spine shelf | 8 spines at 0.75 in take 6 in | 8 spines at 20 mm take 160 mm |
| Numbered grid | 3 columns by 8 rows of 0.5 in cells hold 24 books | 3 columns by 8 rows of 12 mm cells hold 24 books |
| Title list | 8 lines at 0.5 in take 4 in | 8 lines at 12 mm take 96 mm |
The rest of the field stays blank. Empty card at the bottom of the strip is room to breathe, not wasted space.
Which pen will not bleed on the card?
Use the pen that passes a test on a scrap of your own card. The band left at the bottom of the sheet is that scrap, so the pen meets the same card as the strip. Rule a few lines on it and write one title at the size you will use on the tracker. Let the ink dry, rub it with a fingertip, and turn the scrap over. The right pen leaves crisp lines that stay put and do not show through on the back. If the ink spreads into fuzzy edges, shows on the back, or smears under your finger, try another pen on the same scrap. Test a second color the same way if you want one for finished books. A fine tip is easier to control between close lines than a broad one, and a dark color stays readable in the dim light of a bedside lamp.
A pigment fineliner such as Staedtler's Pigment Liner is sold as waterproof on paper and does not bleed when highlighted; its maker suggests 0.2 mm or wider for ruling.
How do you ink and finish the strip?
Ink over the pencil lines with the pen that passed the scrap. Hold the ruler firmly, draw each line in one steady pass, and lift the ruler straight up so it does not drag through wet ink. Wipe the ruler edge now and then, because a smear on the ruler becomes a smear on the next line. Let every line dry before you erase the pencil, and erase gently so the card stays smooth enough to write on. For a shelf or a grid, leave the spaces empty and ink a title or fill a cell each time you finish a book. For a list, ink the titles you plan to read now, and cross each one out as you finish it. If you want a cord, punch the hole in the top margin, clear of the lines.
A hand-ruled strip holds only the lines you gave it, so a busy reading year may need a second strip.
Printing a tracker instead
If you would rather print than rule, the home print steps cover scaling and paper settings, and the paper-weight guide helps you pick a card your printer will feed.
Reading Year is the Print Bookmarks finished-books tracker bookmark: you print it at home and log each book as you finish it.
Sources
- University of Cambridge (retrieved 2026-09-28)
- Staedtler (retrieved 2026-09-28)
- Northeast Document Conservation Center (published 2022; retrieved 2026-09-28)